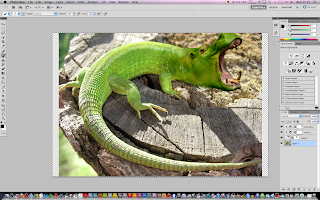
Today we followed a demo on blending two different images together, in this example we used two animals, an image of a lizard and another of a hippo. To start with we opened the image of the lizard in Photoshop,
We then copied and pasted the image of the hippo into the lizard file on a new layer,
Using the "Tranfsorm Tool" we adjusted the hippo image to roughly fit over the head of the lizard, lowering the opacity when needed to see underneath the image,
We then added a new colour balance layer on top of the hippo image with these colour values,
We then created a new layer mask on top of the Hippo layer,
Using the "Brush Tool" with a black colour and soft edges we started to remove parts of the hippo image that we didn't want,
We then created a new layer and adjusted the levels to the values above which added different lighting to the image,
Using the "Clone Stamp Tool" we removed visible parts of the lizard layer underneath that weren't wanted by covering it up with the background,
We then made a selection shown above using a new layer mask and the "Brush Tool"
We then inversed the selection by going into Select, "Inverse"
We then changed the brightness and contrast of the selected area to the above values,
Lastly, we created a new layer and filled it with a very light colour and low opacity to act as a filter above the rest of the images to help blend the layers together.
This demo was very unusual which made it alot of fun, I enjoy blending images together to create another completely different image, and the more time you take doing it the better and more smooth it is, therefore I will definitely be using this technique within my competition entries but spend alot more time on it.


No comments:
Post a Comment