Today we followed a demo on how to create a 3D image using "Curves." Firstly we opened up this image of a piano to work with,
We then duplicated the layer and named one "Cyan" and the other "Red"
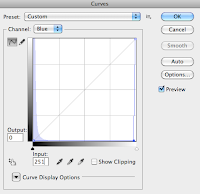
We then opened up curves from the image adjustments tab,
We then set the curve level of the Output to 0 and the Input level to 251 which changed the colour of the layer to cyan,
We then changed the colour of the "Red" using curves, again we set the output level to 0 and the input level to 251
We repeated the process once more but this time on the same layer,
We then created some final touches by changing the blending mode to "screen"
This is the final outcome, put on your 3D glasses to test it though!
Overall, this demo was very exciting as it was something new and showed me how the whole 3D proccess works, I will be creating more from this demo, using it in other work.
First Adaption Of Curves/3D demo
To start off with I opened up this image I found on the web in Photoshop,
I then duplicated the image and renamed the layers, one "Red" for red and the other "Cyan" for yes you guessed it, cyan.

The next step was to create the curves witch change the colour of the layer that create the 3D effect
Changing blending modes to suit the image
I then cut out the image from the background so that it would make it stand out more after i completed the 3D process. I then moved the first layer slightly to the right and the second layer slightly to the left
This is my first adaption towards creating a 3D image, I started by using this image as an experiment of cutting out so that the layers would stand out to look more 3D, although it did not work as well as I hoped it would, I think this could be caused by the black background.
Second Adaption of Curves/3D Demo
This is my second adaption on creating a 3D image using curves, for this piece I took a lot of time in finding the right image for what I wanted to achieve,
Firstly, I decided to cut-out the Yo-yo so it creates more depth once the 3D process is complete, even though it didn't work as well as i hoped in my last piece,
I then changed the curves of the layers which creates the 3D effect to to red, blue, green and cyan
I then moved the first layer slightly to the right and the second layer slightly to the left to create the 3D effect
This is the final outcome of my second 3D image, I think this piece works better than the last because of the use of different layers and that they don't involve a bland black background. I chose this image because of the depth between the man and the yo-yo which helped alot in creating that 3D effect.


No comments:
Post a Comment